How to use the Blog feature on Counselling Network
Blogging on Counselling Network is a simple way to share your voice, your experience, and your way of working — in your own words.
You don’t need to be a professional writer. The most meaningful blogs are often thoughtful, honest, and human.
Why write a blog?
• It helps potential clients understand you before they ever get in touch
• It builds trust by showing your values and approach
• It gives you something meaningful to share on Facebook
• Your writing lives on your profile and keeps it feeling active
• It supports the wider counselling community
Step 1: Create a new blog post
-
Log in to your Counselling Network dashboard
Go to Blog Posts
-
Click New (Add new blog post)
Step 2: Published and Featured (you control visibility)
At the top of the page you will see two toggles.
Published
• Off = your blog is private (not visible to the public)
• On = your blog is live (visible to readers)
You can publish later, or unpublish at any time.
Featured
This controls where your blog appears.
• Featured off = your blog appears on your profile only
• Featured on = your blog may also appear on the Counselling Network homepage
Featured is optional. You can switch it on or off at any time.
Step 3: Preview (use this often)
Use Preview (top right) to see how your blog will look to others.
Preview helps you:
• Check how it looks on mobile
• Check the banner image crop
• Read it as a visitor would
Preview is a safe way to check everything before publishin
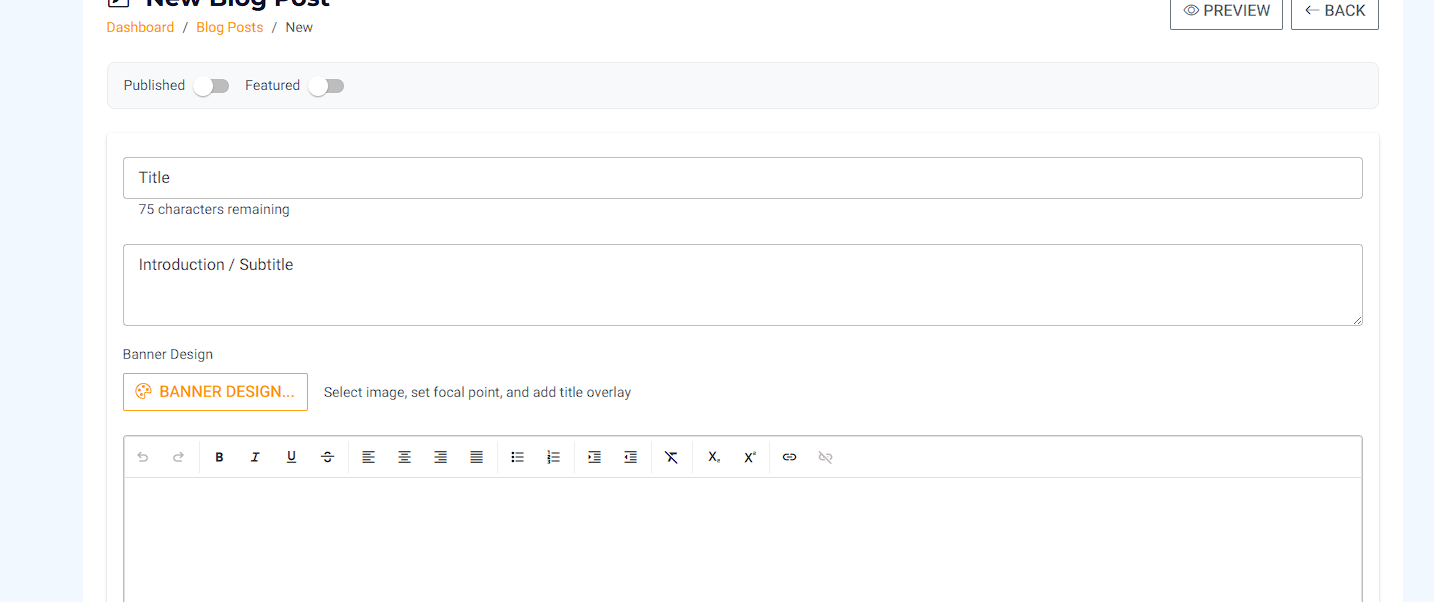
Step 4: Title (up to 75 characters)
Your Title has a 75-character limit to keep it:
• Easy to read
• Clear on mobile phones
• Calm and uncluttered
Short, clear titles work best.
Examples:
• “When talking feels hard”
• “You don’t have to know what’s wrong”
• “Finding space to breathe again”
You don’t need to explain everything in the title. It’s just an invitation.
Step 5: Introduction / Subtitle
The Introduction / Subtitle sits under the title.
It’s usually 1–2 sentences to:
• Set the tone
• Help the reader feel safe
• Gently explain what the blog is about
Examples:
• “Many people come to counselling feeling unsure where to begin.”
• “This is a quiet reflection on what I often notice when people feel overwhelmed.”
• “If you’ve been carrying something alone, this may resonate.”
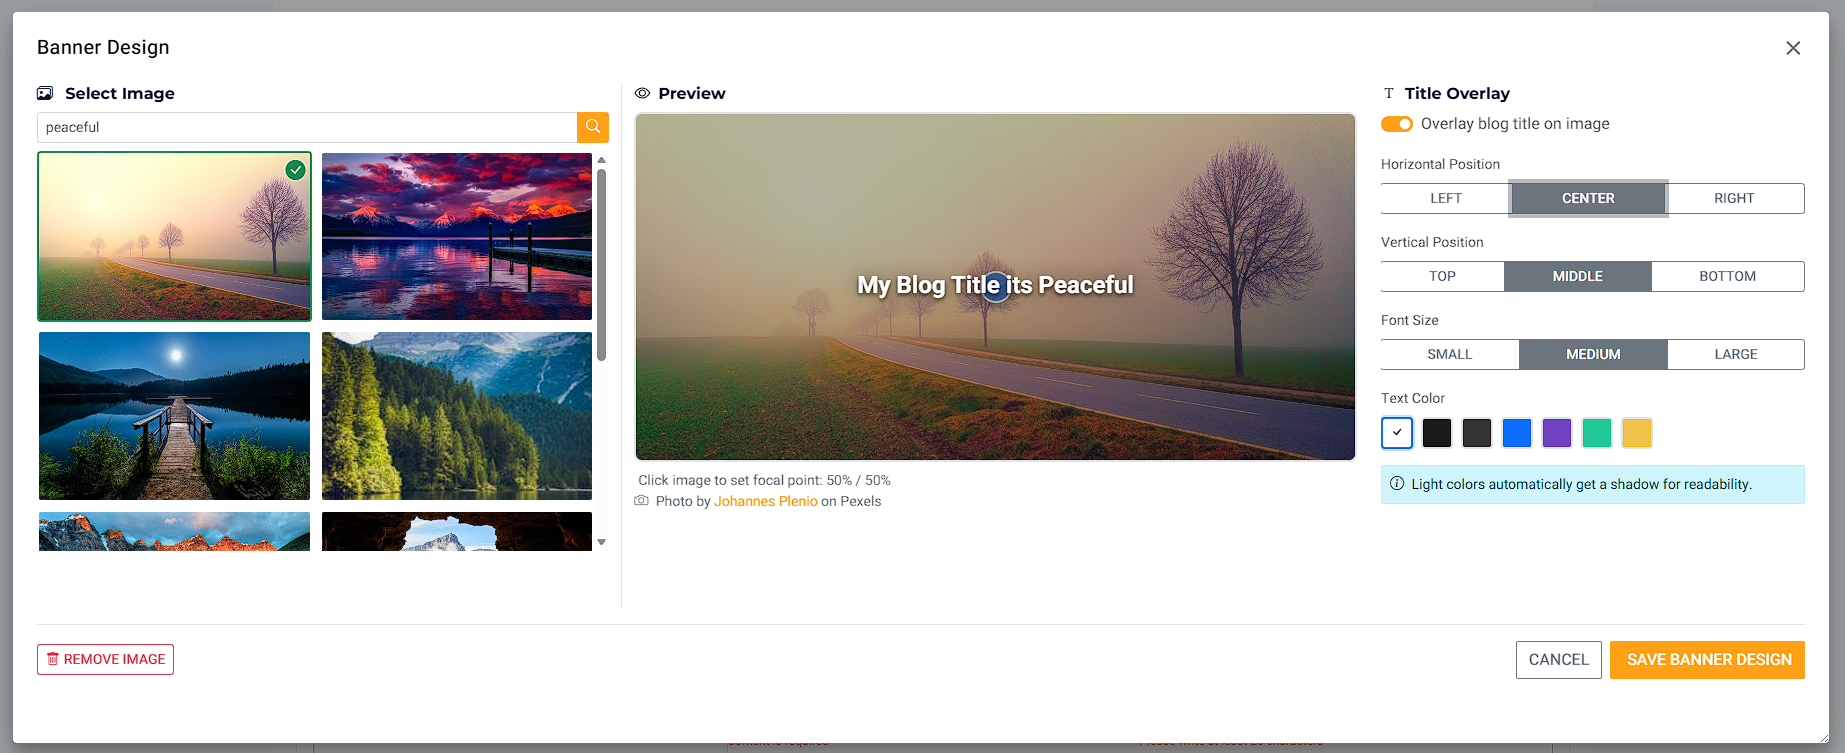
Step 6: Banner Design (image, focal point, title overlay)
Click Banner Design to:
• Choose or upload a banner image (or use stock images)
• Set the focal point
• Add a title overlay if you wish
A great feature: Set the focal point
This helps your image crop nicely on phones and tablets.
If your image includes a person:
• Simply click on the person’s eyes
We then keep that area visible when the image is cropped on different screen sizes, so:
• Faces don’t get cut off
• Eyes stay visible
• The banner stays professional everywhere
Why it works (rule of thirds, simply explained)
In photography, images often look best when the subject sits slightly above centre (about one third down).
By setting the focal point, we crop around what matters — especially on mobile.
Step 7: Write your blog
Write your blog in the main text area.
Tips:
• Short paragraphs are easier to read
• Write as if you’re speaking to one person
• Warm and human beats perfect and formal
You can always edit later.
Step 8: Likes (a quiet way to be appreciated)
Readers can like your blog post.
This is simply a way for someone to say:
• “This helped.”
• “I relate.”
• “Thank you.”
It’s always nice to know your words landed with someone.
Step 9: Where your blog appears
All blogs appear on:
• Your public profile
If your blog is set to Featured, it may also appear on:
• The Counselling Network homepage
From time to time, we may also gently prompt blogs to:
• Other counsellors on the platform
This helps build community and share thoughtful writing.
Step 10: You can always change your mind
You can:
• Edit your blog after publishing
• Unpublish it later
• Switch Featured on or off
• Change the banner image and focal point
Nothing is locked in.